How to set up your own cloud-based code editor
I like my website to be lightweight and static, which is one of the reasons I stuck with Jekyll! One of the pros is being able to write articles in Markdown which I find quicker, easier and less distracting than Google Docs, Word or even LaTeX.
I also like to have full control over my website and my server, which is why I set up Jekyll in a dedicated server through a cheap hosting service and my own domain from Google Domains.
When self-hosting your website however, adding new posts or even making small changes to your website can be rather time consuming. This is especially true when working from different machines.
I eventually came across Coder and the free cloud-editing service behind it code-server.
- Getting your dedicated server up and running
- Setting up your server
- Setting up NGINX and code-server
- Configuring NGINX
- Setting up code-server
- Configuring
code-server - Exposing
code-serverwithnginx
Getting your dedicated server up and running
Self hosting
After some research I ended up going with Vultr as a hosting provider. Being mine a static, lightweight website, I do not really need a powerful server with lots of space.
| Geekbench Score | Storage | CPU | Memory | Bandwidth | Monthly Price * | Hourly Price * |
|---|---|---|---|---|---|---|
| N/A | 10 GB SSD | 1 CPU | 0.5 GB | 0.50 TBIPv6 | $2.50 | $0.00 |
| N/A | 10 GB SSD | 1 CPU | 0.5 GB | 0.50 TB | $3.50 | $0.01 |
| 2413 | 25 GB SSD | 1 CPU | 1 GB | 1 TB | $5.00 | $0.01 |
| … | … | … | … | … | … | … |
I opted for the last option with 25gb SSD and 1GB of RAM which is fairly cheap at AU$ 5 per month.
Domain
In order to make your website secure and trusted you need to set up SSL and HTTPS, and this can only be done with a domain and not with pure IP addresses.
I chose Google Domains in this case as it is fairly cheap and managing DNS records is easy.
Once you set up your domain you can also set up your subdomain for whatever services you might need. This is what my DNS records table look like:
| Host name | Type | TTL | Data |
|---|---|---|---|
| gmarini.com | A | 1 hour | 45.76.124.120 |
| *.code.gmarini.com | A | 1 hour | 45.76.124.120 |
| code.gmarini.com | A | 1 hour | 45.76.124.120 |
| www.gmarini.com | CNAME | 1 hour | @. |
| www.code.gmarini.com | A | 1 hour | 45.76.124.120 |
DNSSEC is disabled and I am using Google Domains servers.
Setting up your server
Now it’s time to set up your server and environment. The first thing you want to do is to set up SSH.
Setting up SSH access
This will differ depending on your provider. On Vultr you can go to https://my.vultr.com/settings/#settingssshkeys, click on the “+” button and then “Add SSH Key”. Give it a name to remind you what is the key for, something like vultr-server-blog.
Now you need to create your SSH key, I found this guide fairly simple and straight to the point Create an SSH Key with OpenSSH.
In short:
- Open
PowerShell - Type in
ssh-keygen -t rsa -b 4096 -C "your_email@example.com" - Confirm the file location
- Enter a passphrase for your key
- Enter the same passphrase again
PS C:\Users\Giaga> ssh-keygen -t rsa -b 4096 -C "your_email@example.com"
Generating public/private rsa key pair.
Enter file in which to save the key (C:\Users\Giaga/.ssh/id_rsa):
Enter passphrase (empty for no passphrase):
Enter same passphrase again:
Your identification has been saved in C:\Users\Giaga/.ssh/id_rsa
Your public key has been saved in C:\Users\Giaga/.ssh/id_rsa.pub
The key fingerprint is:
SHA256:gn18jblysbS0XESUadoWM/2pEFJzSYSCEq1lvstPWJQ your_email@example.com
The key's randomart image is:
+---[RSA 4096]----+
|     .o . .+*B.  |
|     . = o.+X..  |
|      *  Eo+o+ ..|
|     + o. .*o  ..|
|    . o S.B.+ .  |
|       +o= B .   |
|      ..o.B      |
|       o.o       |
|        ..       |
+----[SHA256]-----+
Now it’s usually a good idea to make a backup of the private key as they cannot be recovered if lost! Copy the file somewhere safe, possibly NOT on the cloud!
You can now get your public key from the PowerShell by typing:
(base) PS C:\Users\Giaga> type $env:USERPROFILE\.ssh\id_rsa.pub
ssh-rsa AAAAB3NzaC1yc2EAAAADAQABAAACAQCsQ/tUy8BcGpoWAMCjHHrucZKJLCuOJpFGFxTxhPDy5xet6khpxpfci/cLgyIUm4DEZSGQpCMszl3MXGJ7QuFDoSBue+MebKH9ZC1sK27+DFaFJXvDdD3OhFyTgqwrEIGZ7FKr7GNdMpER+fItUsAKx3ylwBLU4/dh13jsKE968RtApRkluch8M/L3MfzFBaDWJUPO0E+boQv8nOhpZqPU+WL2mzM4j/QA5BGssCGxWOm3zV4m4FTJGlJetN++5P67qTkMyu3U/UW4Y1ItStwnU8Wz/QvRGppOChJgYoAtWfR6MLIXd2iJ1G6IVwtLokVuFnJZFRnOo4BrdabPmqIPD+t3DtBfrsRhXF75IshMrR14r3EYFZKOsX3iJGEWfe3hBmvkoAOmtrV0n70cERcRQdnb8kdgjP4jT60gkt9GMz9UMmAMsMGfhRl3JSMv1bbLoe849xS5T9j/SCMSxQeb6XI6V3mBpFkmIaINs6VwV4/AJGZ9JA/tA175nDrCLsyyo5cGtShNNCYnHSGcFkCc4AWipTTPLdbak3jHetPyK6xn1ExRHKnJd/n65AUFdHNkNj2qj1fSFaWGxOJ706Am6nDWppUVSgWys1J+reXvAt7CFO8lPNhkcWxfJsAfcPpHkvF6fBnPScL8HXa9DwMzbfDNkN7aMkF35sY1z/c34w== your_email@example.com
Copy everything from ssh-rsa to your email included and paste it onto the textbox from the previous point.
That’s it! You can now test your SSH on your PowerShell with
(base) PS C:\Users\Giaga> ssh -i C:\Users\Giaga/.ssh/id_rsa username@123.45.678.910
username@123.45.678.910's password:
[...]
username@vultr-server:~$
If you had already set up your domain and DNS you can also start an SSH session using your domain:
(base) PS C:\Users\Giaga> ssh -i C:\Users\Giaga/.ssh/id_rsa username@gmarini.com
The authenticity of host 'gmarini.com (45.76.124.120)' can't be established.
ED25519 key fingerprint is SHA256:XXXXXXXXXXXXXXXXXXXXXXXXXXXXXXXXXXXXXXXX.
This host key is known by the following other names/addresses:
    C:\Users\Giaga/.ssh/known_hosts:4: 45.76.124.120
Are you sure you want to continue connecting (yes/no/[fingerprint])? yes
Warning: Permanently added 'gmarini.com' (ED25519) to the list of known hosts.
username@vultr-server:~$
Setting up NGINX and code-server
The two most popular choices for web servers are apache and nginx. I have tried them both but personally I find nginx easier to deal with and more intuitive.
Installing nginx is relatively simple:
sudo apt update
sudo apt install nginx
You can then adjust the Firewall rules with ufw. First list all available apps:
username@vultr-server:~$ sudo ufw app list
[sudo] password for username:
Available applications:
  Nginx Full
  Nginx HTTP
  Nginx HTTPS
  OpenSSH
Then allow the ones you need:
sudo ufw allow 'Nginx HTTP'
sudo ufw allow 'Nginx HTTPS'
You can always manage the status of nginx with:
sudo systemctl status nginx
sudo systemctl start nginx
sudo systemctl stop nginx
sudo systemctl restart nginx
sudo systemctl reload nginx
sudo systemctl enable nginx
sudo systemctl disable nginx
Configuring NGINX
Once NGINX is set up you can start serving your own static website by pointing at the folder with the file index.html.
The way NGINX works is by using configuration files contained in two main folders sites-available and sites-enabled.
The usual process is this:
- Create a new configuration file for your wite in the
sites-availablefolder
sudo nano /etc/nginx/sites-available/gmarini.com
- Edit your configuration to point to your website’s root folder. E.g.:
server {
        listen 80;
        listen [::]:80;

        root /var/www/gmarini.com/html;
        index index.html index.htm index.nginx-debian.html;

        server_name gmarini.com www.gmarini.com;

        location / {
                try_files $uri $uri/ =404;
        }
}
- Create a symlink to the file you just created into the
sites-enabledfolder
sudo ln -s /etc/nginx/sites-available/gmarini.com /etc/nginx/sites-enabled/
- Test your file to make sure there are no errors:
sudo nginx -t
- Restart nginx:
sudo systemctl restart nginx
Setting up code-server
Now that you know how to configure NGINX is time to set up Visual Studio Code! While Visual Studio Code is not officially made to be run in a browser, the fact that it’s developed on top of GitHub’s Electron means that it is pretty much a webapp itself. In fact VScode uses Chromium engine for rendering and node.js to handle local APIs, making it easily portable to the web!
As explained in the intro, a web port of VSCode called code-server can be found here.
So first things first, let’s install code-server by using the official install script:
curl -fsSL https://code-server.dev/install.sh | sh
The documentation is quite detailed and well done! For reference, the next two steps are a quick summary of these two bits:
Configuring code-server
Code-server uses password authentication by default. The password can be find in its config file located at ~/.config/code-server/config.yaml We can also set the binding address and port.
sudo nano `~/.config/code-server/config.yaml`
My config file looks something like this
bind-addr: 0.0.0.0:8080
auth: password
password: xxxxxxxxxxxxxxxxx
cert: false
Exposing code-server with nginx
Opening the server’s ports
Let’s also make sure that we our Vultr server allows connections through the port we just chose. Most providers will handle Firewall rules through security groups. You can create a new security group accepting TCP and UDP connections from the port you have chosen (8080 in this case) and from any ip/subent usually denoted as 0.0.0.0/0. Sometimes you might have to create two different rules, one for TCP and one of UDP connections, with the same port and IP range.
Forwarding port to subdomain
Now that code-server is set up we can link it with the subdomain we created earlier code.gmarini.com.
Let’s create a new nginx configuration file for code-server
sudo touch /etc/nginx/sites-available/code-server.conf
The server configuration should look something like this:
server {
    listen 80;
    listen [::]:80;
    server_name code.gmarini.com www.code.gmarini.com;

        location / {
                proxy_pass http://127.0.0.1:8080/;
                proxy_set_header Host $host;
                proxy_set_header Upgrade $http_upgrade;
                proxy_set_header Connection upgrade;
                proxy_set_header Accept-Encoding gzip;
        }
}
Now let’s enable the new configuration
sudo ln -s ../sites-available/code-server /etc/nginx/sites-enabled/code-server.conf
And reload nginx
sudo nginx -t && sudo nginx -s reload
Get an SSL certificate with Let's Encrypt!
Now that the server is ready and the IP is linked to the domain, we need to set up an SSL certificate for the domain itself. We can self-validate our domain by using certbot.
First let’s install certbot
sudo add-apt-repository ppa:certbot/certbot
Then let’s make sure the right ports are open
sudo ufw allow 80
sudo ufw allow 443
Finally, we can certify our domain by providing our email address:
Let’s encrypt
sudo certbot --non-interactive --redirect --agree-tos --nginx -d code.gmarini.com -m giaga7@gmail.com
Just follow the prompts and you should be ready to go! Certbot will automatically add the certificate to your nginx configuration file code-server.conf which should look like something like this in the end:
server {
    server_name code.gmarini.com www.code.gmarini.com;

        location / {
                proxy_pass http://127.0.0.1:8080/;
                proxy_set_header Host $host;
                proxy_set_header Upgrade $http_upgrade;
                proxy_set_header Connection upgrade;
                proxy_set_header Accept-Encoding gzip;
        }

    listen [::]:443 ssl; # managed by Certbot
    listen 443 ssl; # managed by Certbot
    ssl_certificate /etc/letsencrypt/live/code.gmarini.com/fullchain.pem; # managed by Certbot
    ssl_certificate_key /etc/letsencrypt/live/code.gmarini.com/privkey.pem; # managed by Certbot
    include /etc/letsencrypt/options-ssl-nginx.conf; # managed by Certbot
    ssl_dhparam /etc/letsencrypt/ssl-dhparams.pem; # managed by Certbot
}
server {
    if ($host = code.gmarini.com) {
        return 301 https://$host$request_uri;
    } # managed by Certbot


    listen 80;
    listen [::]:80;
    server_name code.gmarini.com www.code.gmarini.com;
    return 404; # managed by Certbot
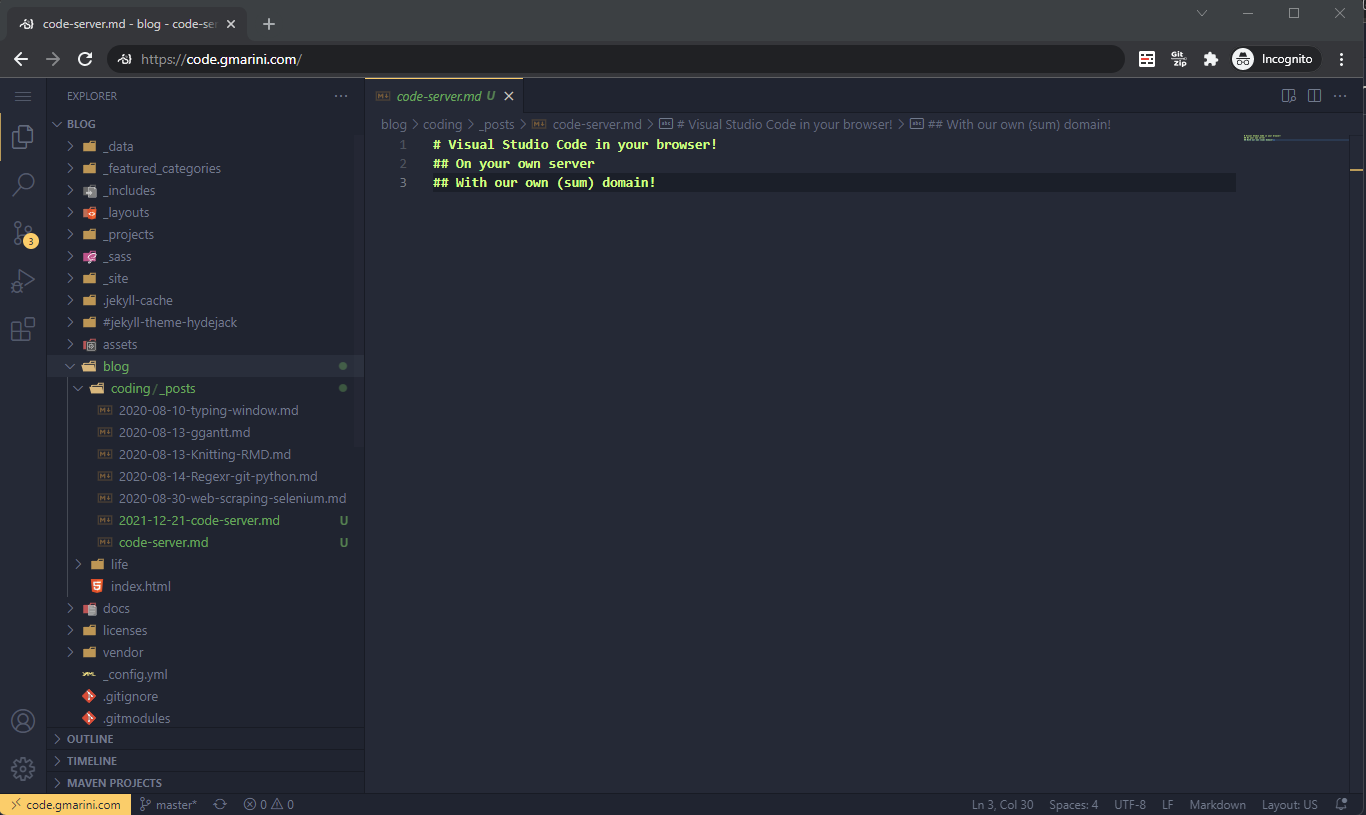
Finally, we can restart code-server and test it out by navigating to our subdomain!
sudo systemctl restart code-server@$USER